
Eleven Basic Mistakes You’re Making When Mixing Vocals
A Guide to Vocal Mixing in Logic Pro X
You’ve already read up on mixing 101 and have some vocals recorded on a track that you’re trying to mix.
But you can’t seem to be able to make your vocals pop like the other songs on that Spotify Playlist you’re aiming for. Either they’re muddy, boxy, brittle or even worse - there’s nothing specifically wrong that you can pinpoint, they’re just not sitting well in the mix.
It’s likely you’re making at least one or more of these eleven common vocal mixing mistakes. Don’t worry though! We’ve all been there.

Like anything in mixing, there are rarely one-size-fits-all, hard and fast rules. Ultimately it comes down to what sounds good, but this post will give you some good starting points.
I’ll be using Logic Pro X for this guide. Nevertheless, the underlying principles apply across the board with any DAW.
The order of these eleven points also represents the order in which I recommend building your vocal channel strip, so reading it in order will also function somewhat as a basic vocal mixing guide. I’ll be using Logic’s native plugins only as this post is geared toward beginners with some mixing experience.
Lastly, I’ll assume you’ve got a relatively clean and dry vocal recording and not something done in a bathroom or an empty closet.
1. Your low-end roll off is…off.
Rolling off the low-end on a vocal can be tricky. There’s a balance needed in order to get things sounding right.
Common issues:
Not rolling off at all, giving that 18 wheel semi on the motorway 1km away a low-key feature in your song
The roll off point being too high, thinning out the vocals too much
The roll off slope being too steep, creating an artificial sound
The first thing to understand is that the main characteristic in a vocal is generally upwards of 150Hz. This basically means that below 150Hz, the signal information is of decreasing importance to how it sounds.

Where to start:
Add Logic’s Channel EQ to your channel strip
Enable the left-most node (the High Pass Filter)
Change Slope to 12dB/Oct
During playback, increase frequency from 20.0Hz until you hit a point where you can hear the vocals begin to thin out in an undesirable way.
Slowly decrease frequency until it sounds good again.
This should remove unwanted sub bass frequencies picked up by your mic that don’t add anything useful to the vocal, take up unnecessary headroom and cloud the mix.
Something to think about:
The more space the vocals have in a song, the broader the range of its natural lower tones that should remain.
So if you’re mixing a song with just a vocal and a guitar, you might use something like 12dB/Oct at 100Hz. The more gentle slope at a lower frequency will preserve more of the vocal’s low-end in a natural way.
But if you’re mixing vocals for rock, metal, energetic pop or any song with many loud layers fighting for their spot on the glorious frequency spectrum, it might be more like 18dB/Oct at 150Hz. In this case the lower frequencies aren’t as important to the mix.
There are other factors that can influence how much you roll off, too. For example, when recording vocals with my SM7B (dynamic) it tends not to pick up much sub-bass at all, and so an aggressive roll off isn’t even necessary. There’s also the proximity effect.
Just make sure that you listen carefully and pay close attention to how things are sounding.
2. You’re Over Compressing Your Vocals.
You already know you’re supposed to compress your vocals. The problem is you’ve gotten too excited and squashed the life out of them; now they sound like a whole mess.
Common issues:
Using only one compressor with aggressive settings
Setting the attack time too quick for the style of vocal
Vocal compression deserves an entire blog post on its own. I’m not going to do that because there are a ton of great ones out there, like this one.
I’m just here to tell you to stop smashing your lead track with 10:1 ratios and 10dB+ of gain reduction. That ain’t it, fam.

Instead of smashing your vocal with one compressor, use multiple. By stacking two or more compressors and only getting them to do a little bit of work each, you’ll get a more natural and transparent sounding vocal but with tightness and punch.
If you’re a Logic Pro X user, you can make use of the fact that it comes with several different compressor models (that are actually quite underrated by the way)
Personally I love the Studio Fet + Classic VCA combo (Or Vintage Opto, but I like the simplicity of the Classic VCA).
Where to start:
NOTE: I’d recommend stopping/muting playback before adding each Compressor to the channel strip, because Logic’s compressors default to -12dB of AUTO GAIN which often an unpleasant and unnecessary jump in loudness)
Compressor 1
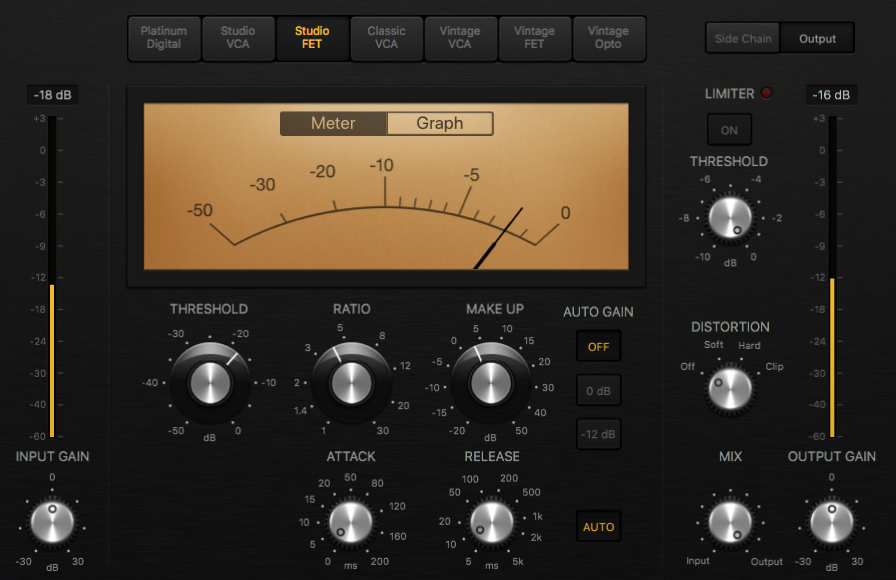
Add a Compressor to the vocal channel strip.
Select Studio FET
Set AUTO GAIN to OFF
Set RATIO to 4.1:1
Set ATTACK to 3.0ms
Adjust threshold until there is 3-4dB of gain reduction at the loudest parts of the vocal
Increase MAKE UP to 3.5dB

Compresser 2
NOTE: You don’t have to put a second compressor directly after the first. Some people put it after their taste EQ or at another stage.
Add another Compressor to the vocal channel strip
Select Classic VCA
Set AUTO GAIN to OFF
Set RATIO to 3.1:1
Adjust threshold until there is averaging 3dB of gain reduction
Increase MAKE UP gain to 3.0dB
Your vocals should now sound a lot smoother but with it’s natural dynamic preserved.
Something to think about:
The attack and release times of a compressor determine how quickly it starts and stops gain-reducing after a signal crosses above and below threshold, respectively. Transients (the initial percussiveness of a sound) get smoothened out with shorter attack times and longer release times. This generally works for lead singing in most genres, however sometimes it’s not desired. In the case of Hiphop, especially when a rapper is rapping fast and aggressively, it often sounds better to preserve those transients. Play around with longer attack times (up to 20-30ms) and shorter release times (10ms or less).
3. Those low-mids are running wild.
We all hate muddy vocals that don’t cut through. Low-mids are usually the culprit.
Common issues:
Not dealing with them at all (vocals are muddy)
EQing them out too hard (vocals sound thin and scooped)
Not addressing how they vary through the song (inconsistently boxy or scooped)
Arguably the most problematic frequency zone for vocals is approximately 200-500Hz. Even in the most ideal recording conditions with beautiful and expensive high end equipment, these frequencies still often need adjusting. And chances are, that isn’t a description of what you’re working with, so these frequencies are extra important for you to deal with.

Where to start:
Add a Channel EQ to the channel strip
Select the fourth node and set the Q value to 0.93 and a frequency to 350Hz
Cut the gain slowly until that boxiness is a thing of the past. I find that 2.5dB - 3dB is appropriate, but it could be more depending on how bad the problem is.
If that frequency isn’t solving the problem, make slight adjustments until you find one that works better.
Be careful not to cut too hard then your vocals might lose their character and start sounding too scooped. Make sure you are comparing the solo’d vocal with the vocal in the mix to hear your adjustment in context. Also, make frequency comparisons between the vocals in your mix and other commercial releases.
This would be a good point to start making your other EQ adjustments to taste. Err on the side of subtlety, but don’t be afraid to make bigger changes where necessary.
Fixing the low-mid issue with Multiband Compression
There’s a chance that even this method doesn’t fix things satisfactorily. You might notice that some parts of the vocal are fine but other parts are still too boxy or too brittle. In this case, you may need the helpful hand of Logic’s Multipressor.
Wait, what the hell does that do?
Multipressor is Logic Pro X’s contribution to the world of multiband compression. A full treatment of that concept is out of the scope of this post but check out this link if you are interested.
The short version: Multi-band compression will apply compression to a group of frequencies, as opposed to the whole signal like a normal compressor does. Still confused? OK, just know that, when used properly, the Multipressor will intelligently cut those annoying low-mids when they get too much.

Where to start:
NOTE: If you use this method, it might pay to reduce or remove reductions to the low-mids made with the Channel EQ.
Add a Multipressor to the channel strip
Hit BYP on bands 1, 3 and 4
Adjust the left Crossover value to 220Hz and the upper to 610Hz.
In the bottom section, adjust the ratio to read 3.000.
Slowly adjust the threshold downward (you can do this in the upper section by moving the horizontal bar in band 2) until you’re seeing what looks like -3dB of gain reduction on average.
This should sound similar to what the EQ did, but you might notice that it’s controlling the low mids more dynamically.
4. You’re Not Using Parallel Compression.
I just told you that you’re probably over-compressing your vocals, but I’m out here telling you to stack your vocal channel with multiple compressors and a multipressor; now I’m telling you ‘bout this thing called parallel compression.
Common issues:
Not using it
Hear me out, though. Parallel compression is a big topic, and you can read one here.
The short version: Parallel compression is just like normal compression, except you keep some of the dry (uncompressed) signal in there as well.
It’s a simple concept which is widely understood and misused. But when used probably, it can yield fantastic results. You can achieve extra fullness and detail in the vocal whilst retaining a lot of its natural dynamic.
You’re missing out on some of the fullness and subtle detail that can be extracted from the vocals if you don’t use this technique.
Logic Pro X’s compressors have built in parallel functionality. A lot of compressors do, but many don’t. If you don’t have one that does, you have a couple of other options. Use a send or a duplicate track
I’ll go over both the other options too, as they do slightly different things.
Logic Pro X Compressor Built In Parallel Function
All compressors on Logic Pro X have a knob labelled MIX which defaults to 100%, meaning the output is solely the compressed signal. To engage parallel compression, all you do is adjust the knob. Yup, it’s that simple!
My favourite Compressor model for parallel compression on vocals is Studio VCA.

Where to start:
Add a Compressor to the channel strip
Select Studio VCA
Turn MIX knob down to 0%
Ratio of 10:1, Auto Gain Off and Make Up Gain set to 10dB
Adjust Attack to 3.0 ms and Release to 10.0 ms (turn off Auto)
Reduce threshold until there is on average 10dB of gain reduction
Slowly increase MIX knob until you hear an increase in detail and loudness. This is usually around 30-40%
This can take some practice to know exactly what you’re listening for, so do comparisons with the plugin switched on and off. When switched on, the vocals should feel like they’re closer to you.
Parallel Compression using a Send
Peep this article to learn how to add a Send, if you don’t already.
Add a send to your vocal channel strip.
Adjust the send amount to unity (0.0) gain. Helpful hit, Option + Click will do this real quick.
Go to the auxiliary channel the send is routed to. Turn the fader all the way down
Add a compressor to that channel and follow the steps in the previous section, except leave the MIX on 100%
Turn up the fader on the auxiliary channel until you hear that extra clarity and presence. Adjust to taste.
This differs from the previous method in the following way; the auxiliary track is compressing the signal affected by the entire channel strip including any extra plugins you add after this point.
On the other hand, the previous method, i.e. adding a Compressor to the vocal channel strip and using its in-built parallel functionality, only compresses the signal processed by plugins that come before it. Any plugins you add after it will obviously not affect what is being compressed.
Why is this important?
When mixing, it’s always good to be aware of signal flow. In this case, it means understanding that any reverbs, delays, or other FX added to the vocal channel strip will be compressed in parallel. This might cause some undesirable effects, and if you’re not aware of what’s going on you’ll think that the FX are acting strangely without explanation.
For this reason I personally don’t recommend this method.
Parallel Compression using a Duplicate Track

Where to start:
Create a duplicate audio channel and copy the vocal onto it.
Turn the volume all the way down
Add a Compressor to that channel and follow the steps in the section on using the Compressor’s In-Built parallel functionality, except with the mix knob at 100%
Adjust volume fader to taste.
As you should be able to see, this method does not have the drawback of the Send method. The Compressor doing the parallel compressing will obviously only work on the duplicate channel as is.
The setback here is that you have an extra channel to deal with, but that’s not a major issue.
Note also that the Duplicate Track method allows you to edit the vocal on one track to create some potentially interesting effects, but that’s not too relevant here.
As usual, use careful listening. Parallel compression on vocals is particularly exciting if you’re new to it but it’s easy to overcook, producing all the sonic issues created by overcompression.
5. You’re Not Using Distortion.
Failing to do this means you’re potentially missing out on more fullness and colour in your vocal mix.
Common Issues:
Not using it cos you think it’s only for metal
Overcooking it and making your folk song sound like metal
I’m not (necessarily) talking about harsh, aggressive, grunge-sounding fuzz. I’m talking about harmonic distortion, which in this case is actually just the purposeful introduction of extra harmonic overtones to an audio signal.
Digital distortion, i.e. what happens when your signal exceeds the 0.0dB peak, is never good (another form of digital distortion is that which is created by digital compression of audio files. Also not good). Harmonic distortion on the other hand can significantly enhance a recording - especially vocals!
A common type of distortion used on vocals is called Saturation, which includes some compression characteristics. Read more about it here.
Logic Pro X has a variety of different options when it comes to Distortion / Saturation on vocals.
I won’t cover all of them, but I’ll touch on four of my favourites:
Overdrive
PHAT FX
Distortion II
Tape Delay (Yep, I said it)
I recommend only using one of these on your vocal channel unless you’re purposefully going for a stylistically distorted sound.
Overdrive
Overdrive is a cool plugin that simulates a kind of distortion produced by something called a FET. More about it here.
When it comes to vocals, I find it to be generally applicable for most genres.
What’s great is that you don’t even need to crank its drive setting. Merely having the plugin on the channel creates a noticeable effect (think of it as running the signal through its digital “circuit”).

Where to start:
Add Overdrive (>Distortion) to your vocal channel strip.
Set the Tone knob down to 11200Hz (not all the way to 20k, as FETs can create unwanted harshness in the higher frequencies)
Switch on Level Compensation
Begin with the drive at 0.00dB and increase slowly to taste. I find that about 2-3dB does enough to bring the vocals forward and give them some extra presence.
Make sure you toggle the plugin on and off to assess the changes you’re making and listen to it against the mix. It’s easy to overcook this!
PHAT FX
This is a relatively new addition to Logic’s plugin library, relative to the programme’s history. Opening it you can see it actually does a ton of different things, but let’s have a look at its DISTORTION feature.

Where to start:
Add PHAT FX (> Multi FX) to your vocal channel strip
Under MASTER, set the Mix to 60% and Output to 0.0dB
Disable all blocks except DISTORTION
Turn all knobs to 0%
Turn the first knob up to 16.0%
Under the second knob, select Tube
Turn the second knob to 11.0%
For a bit of extra thickness and beef
Enable the BASS ENHANCER
Set the Amount to 60%
Set the Tune to 140Hz
These settings should add a touch of attitude to the vocal. Play around with these values until you find something that works for your song.
Distortion II
This plugin emulates the distortion created by a Hammond B3 Organ. More on it here.
This tends to be a more aggressive distortion purposed for sound design, but I have found it can be useful for vocals on tracks that require a lot of energy - Rock, EDM, some Pop etc.

Where to start:
I recommend muting the channel first, as the abrupt change in loudness can be quite jarring!
Add the Distortion II (>Distortion) plugin to your channel strip.
Set the PRE GAIN to 0.0dB (Note that this is 10’o Clock on this knob)
Set the DRIVE to 0.32
Set the TONE to -5.00dB
Instead of ‘Nasty’, select Class AB1 soft
Click the small arrow at the bottom left to expand the extra options
Make sure Distortion Output Level is at 0.0dB
Start with the Mix at 0%. Unmute the track and increase to taste. You should hear an increase in presence and grit as you go. I find that around 60% gives me what I need
Tape Delay
I bet you didn’t know about this little chestnut. Tape Delay (to my knowledge) was not designed to be used as saturation / distortion; nonetheless it’s parameters can be tuned for it.

Where to start:
Switch off Tempo Sync and turn the Delay Time down to 0.0ms
Set the Clip Threshold to -5.0dB
Make sure Tape Head Mode is on Clean
Set the Dry OUTPUT to 100%
Starting from 0%, increase the Wet % until you can hear a change in thickness
Adjust the Clip Threshold down for an increasingly distorted effect.
This is a more “colourful” distortion method - it will change the sound considerably and you will likely need a bit of corrective EQ to get rid of the less desirable elements. Nevertheless, it can add some improvement when done correctly.
Note also that you adjust the Low Cut and High Cut to isolate a range of frequencies you wish to saturate. I find that isolating between 60Hz and 180Hz with Wet at 25% gives the vocals a kind of beefiness that can’t quite be achieved by using the EQ.
Other options offered by Logic Pro X for distortion / Saturation include:
Compressor DISTORTION settings
Distortion Plugin
Clip Distortion Plugin
PHAT FX XY Axis Settings
Scanner Vibrato
6. You’re Not Giving Your Vocals Air.
Your vocals may sound a bit choked, suffocated or just damped if they don’t have ‘air’.
Common issues:
Not using the High Shelf on the Channel EQ
‘Air’ is actually a term used to refer to a band of frequencies in the upper range of the audible spectrum. Generally speaking, it is from about 12kHz+
There isn’t actually any real vocal information in this range, but the effect is like having someone speak to you behind a bed sheet vs having that sheet removed. There’s a subtle difference created by the elevated high frequencies that makes the vocal sound crisp and like it’s right there in your face, which is often what you want when mixing a lead vocal.
Where to start:
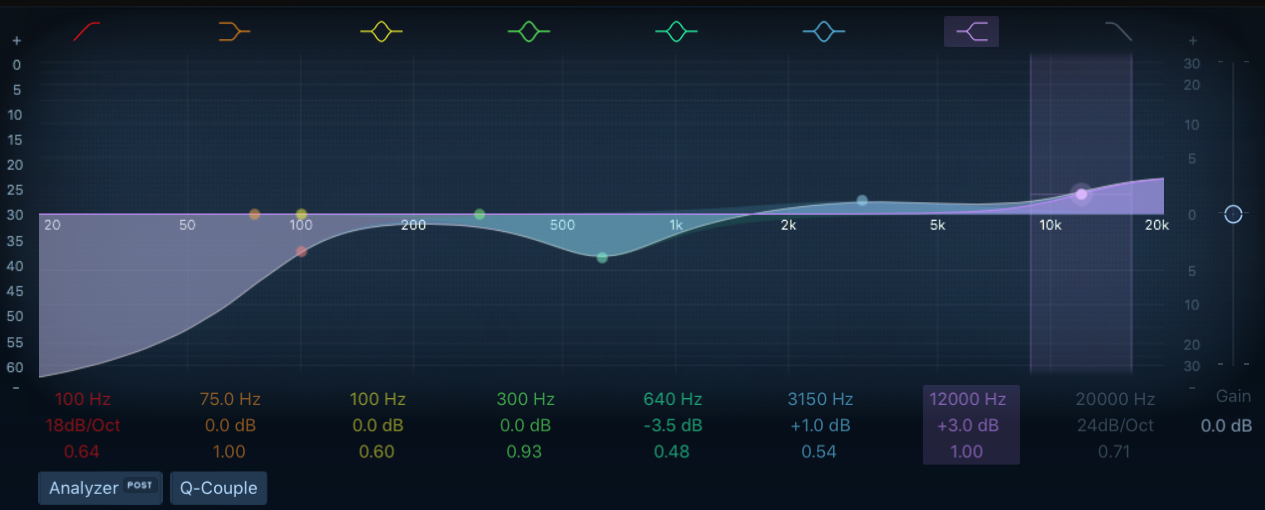
Open up the channel EQ on your channel strip
Select the High Frequency Shelf node (second from the right)
Adjust the frequency value to 12000 Hz
Slowly increase the gain to taste. I usually use between 3-5dB, depending on what the recording needs
Be careful not to overdo this, otherwise the vocal will start sounding too harsh and piercing.
7. Your De-essing Sssssucks.
To be fair, it's probably not your fault. Logic Pro’s De-Esser is one of the weaker additions to its suite.
Common issues:
Using Logic Pro X’s De-Esser
For those who don’t know, de-essing is the practice of controlling sibilance (or “ss” sound). This is especially important for vocals if using heavy compression and saturation because these processes tend to emphasise and exaggerate sibilance, making it a very unpleasant listening experience.
To be honest, your best bet is to spend a bit of coin on a decent De-Esser plugin. Waves De-Esser does a fine job, and Fab Filter’s own version is exquisite.
But for those of you who have to stay in-the-box, read on!
Two workable in-the-box options for Logic Pro X users are:
Multipressor
Side Chain Compression
Multipressor as De-Esser
Check out section 2 of this post for more info on the Multipressor
We can use multi-band compression to handle our sibilance by isolating the frequency band where sibilance is particularly bad and then compressing it. It can be anywhere between 5kHz to 14kHz depending on the recording, but I find 6-10kHz to usually be the worst.

Where to start:
Add another Multipressor to the channel strip.
Bypass bands 1, 2 and 4
Adjust the middle Crossover value to 6300 Hz and the right most Crossover value to 11200 Hz
Increase the Ratio to 16.5000
Loop playback of the vocals over a section where there is noticeable sibilance (S and T sounds)
Adjust the Compr Thrsh until only the S and T sounds trigger significant gain reduction.
This should sound like your sibilance is being reduced without impacting the rest of the signal.
Side Chain Compression
Side Chain Compression is another doozy of a subject that I encourage you to read up about.
The short version: It’s just like normal compression but instead of the main signal triggering the compressor, a different signal does. Often that signal is just a filtered version of the main signal. However, it can be a completely different signal altogether.
For the purpose of de-essing, we’re interested in using a filtered version of the vocal to trigger our compressor, i.e. one where the sibilance frequencies are isolated.

Where to start:
Add a Compressor to your vocal track.
Select the Platinum Digital algorithm
Set AUTO GAIN to OFF. Keep MAKE UP at 0
Set the Threshold to 0
Set the Ratio to 30:1
Turn OFF AUTO (release)
Set the ATTACK to 3.0 ms and RELEASE to 5.0ms
At the top right, select Side Chain.
Under DETECTION, select PEAK
Under FILTER, select LISTEN
Under MODE select BP (Band Pass)
Under Q, adjust the knob to 0.63
Loop playback of the vocals over a section where there is noticeable sibilance (S and T sounds).
Adjust the FREQUENCY knob until the sibilance is most emphasised. For my recordings this is usually around the 8000 Hz mark
Once you’ve found that frequency, under FILTER select ON
You should now hear the normal vocal signal. Adjust the THRESHOLD down from 0. You will notice the S and T’s triggering the meter
Keep lowering the Threshold slowly until you find the spot where the meter is being triggered by non-sibilance, then raise it back up slightly.
You should hear the sibilance being handled.
Whilst both these methods (sort of) work, it’s worth pointing out that they work differently.
The Multipressor works by listening for the offending frequencies and dipping them (like a smart EQ cut).
Side Chain Compression on the other hand will listen for the offending frequencies and dip the whole vocal signal. We can get away with this on a mono vocal track, because generally whenever sibilance occurs it constitutes the whole signal (with the exception of a “Z” sound). This method, however, will run into problems when trying to de-ess more complex signals.
8. You’re Not Limiting.
Not sure what limiting is? read about it here.
The short version: Limiters are hardcore compressors that don’t let any signal past a specified level.
Common issues:
Not using it ‘cos you think Limiters are for mastering
Their most common usage is in mastering, but they can actually help us clean up our vocal tracks too.
Even after stacking multiple compressors and using some saturation (which has a compression effect), sometimes we still have some peaks taking up unnecessary headroom.

Where to start:
Add a Limiter to the vocal channel
Set the Release to 82.0ms
Increase the Gain knob until you are seeing maximum 2.5dB of gain reduction on the loudest parts of the vocal
Reduce the Output level to compensate for the loudness increase
This creates a more forward and even sounding vocal. On more acoustic genres, I would recommend max 1dB of gain reduction (or even none at all). For harder, more full on genres where the vocals need to really be in your face, you may be able to get away with 4-5dB.
9. You’re Not Treating Your Reverb
A whole blog post could be dedicated to each of these points and this is especially the case with vocal reverb.
The art (and science) of vocal reverb is difficult and takes a fair amount of time and practice. But part of what is setting you back is failure to treat your reverb.
EQing reverb can tidy up the mix by reducing frequencies that fight with the dry vocal. Side Chain Compressing your reverb using the dry vocal as the side chain can intelligently push your reverb out of the lead vocal’s way.
Common issues:
You’re using a reverb plugin on the vocal channel strip instead of Sending it to an auxiliary channel where you can treat it.
In Logic Pro X, Space Designer and Chroma Verb have their own EQs, so they could be added as plugins on the channel. And whilst sometimes the lazy part of me does this, it’s not great practice.
Using Sends gives you far greater control and flexibility when it comes to utilizing reverb. It also allows you to use other plugins on it, like the Compressor.
EQing your Reverb
How you EQ your reverb will depend largely on the type of reverb you choose, but there are usually a couple of problem areas.

Where to Start
Set up a Send for your vocal channel and add your desired reverb to the auxiliary channel.
Set the Reverb output to be completely Wet.
Adjust the fader on the Reverb auxiliary a bit louder than necessary, because we want to
Add a Channel EQ to the auxiliary channel.
Roll off the low end on the reverb. I recommend up 24dB/Oct at 200Hz with a Q of 0.54
Deal with low mid clutter - cut around 5-6dB at 375Hz with a Q of 0.54
Deal with "bathroom phenomenon" - cut around 2-3dB at 2000Hz with a Q of 0.6
Depending on the sound you are going for, you may want to dip the high shelf 2-3dB
Side Chain Compressing your Reverb
In the part of this post about De-Essing (section 7) we used a filtered version of the vocals to trigger the compressor. Here, we’re going to use a different signal altogether.
Here the Compressor will be compressing the reverb signal, but will be being triggered by the dry signal. This is so that it reduces the reverb while the dry signal is coming through, thus creating space for the dry signal and improving the clarity of the overall vocal.

Where to Start:
Add a Compressor to the auxiliary channel (where the Reverb is)
Select Platinum Digital
At the top right of the window, where there is a dropdown list labelled Side Chain, select the channel your lead vocals are on (this might be hard to find if you haven’t labelled it well :) )
Turn AUTO GAIN to OFF
Set RATIO to 2:1
Set ATTACK to 1.0ms
Set RELEASE to 5.0ms
Adjust THRESHOLD to taste
You should notice the reverb being less intense, but still very much present.
This can be quite difficult to wrap your head around and I would advise spending some time on it. You can read about it here.
10. You’re Not Using Pre-Delay On Your Reverb
No matter how hard you try to tweak your reverb, the vocals still sound like they're in a bathroom, a hall, or a hall-like-bathroom.
But the vocals in your favourite commercial tracks have a ton of reverb and still sound good, so what gives?
Common issues:
Pre-Delay setting on reverb plugin stays set to 0
Pre-Delay is just the amount of lag time before the reverb kicks in. I won't bore you with the psychoacoustics explaining how and why our brains interpret reverb the way they do, but just know that a little bit of Pre-Delay can be the difference between slick sounding vocal verb and an echoey mess.
I will use Space Designer as the working example.

Where to start:
If you haven’t already, Set up a Send for your vocal channel and add Space Designer to the auxiliary channel
Select and configure your reverb to taste
Turn on Predelay Sync (the quarter note symbol beside the label)
Adjust Predelay to taste. I recommend 1/64
If your reverb plugin does not have a sync feature, you will have to do some math to calculate the appropriate Pre-Delay time. This isn’t absolutely essential (playing around with it until it sounds fine is a valid tactic) but with a precise Pre-Delay time, you can be confident that the reverb will work rhythmically.
But don’t fret, I’ve done it for you:
Pre-Delay time (ms) = (240 000 / Tempo) * Beat Division
For example, if our song is 100bpm and we want to figure out the Pre-Delay in ms equal to a 1/64:
(240 000 / 100) * 1/64 = 37.5
So, approximately 38ms.
11. You’re Not Using any Volume Automation
You may be finding that your vocals are nice and present and sitting well in the mix at one part of the song, but getting buried during some extra loud bits or poking out too much at the softer bits. Or, you may find that, despite the compression, saturation and limiting, there are still some words or syllables getting lost, or some that peak too high compared to the rest of the vocal.
Common issues:
Not using volume automation because you didn’t think of it
These problems can both be solved by volume automation.
If you aren't familiar with how to engage automation on your DAW, it'll pay to do some googling before reading on.

If the issue is that the volume of the vocal doesn't work during every part of the song, the solution is to automate up or down the relative volume of the vocal for that section. Usually between 1-2.5dB up or down should be able to fix the problem in a transparent way.

How to find the Relative volume control for automation.
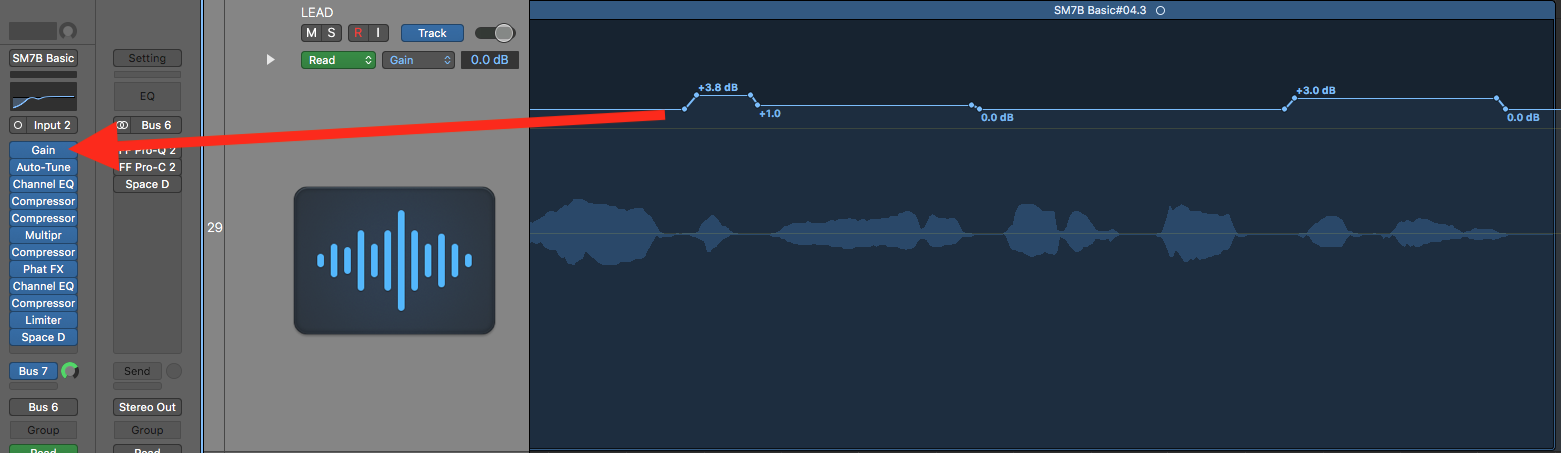
If the issue is that smaller elements of the vocal are too loud or soft, the answer would simply be to automate the trim on those parts (or insert a gain plugin first in the vocal chain and automate the gain). Here, you may find more drastic dB adjustments are needed. Fixing gain inconsistencies on the signal before it hits the compressor(s) will make their jobs easier, plus your ears will love you for it.
Going Forward
Obviously this is by no means the be all and end all of vocal mixing. This works as a basic guide, however the purpose was to highlight some potential gaps in your skillset, which in turn may help you get closer to that glossy, professional sound using what you've got.
All of the specific settings and values I've given here are only starting points. There are too many potential variables to give you sure fire, one size fits all settings. Play around and don’t be afraid to develop your own style and techniques. So long as you practice careful listening, you will make steps towards being able to consistently get the best result for your mix.
Check out these dope in-depth articles on vocal mixing techniques that will help you take your mixes to the next level!
https://www.soundonsound.com/techniques/advanced-vocal-compression
https://producerhive.com/music-production-recording-tips/how-to-use-a-vocal-eq-chart/
https://www.izotope.com/en/learn/essential-tips-for-using-reverb-on-vocals.html
Questions and comments welcome. Please also get in touch if you would like me to mix and/or master your project.